
How to Create a Browser Profile
Learn how to create a browser profile in MasBrowser: basic info fields, fingerprint defaults, proxy options, advanced settings, and batch creation.
This guide explains how to create a browser profile in MasBrowser, covering the full field reference for single profile creation, fingerprint recommendations, and how to use batch creation.
Step 1: Open the Creation Entry
After logging in to the client, go to the "Profile Management" page and click the "+ Create Profile" button in the upper-left corner.
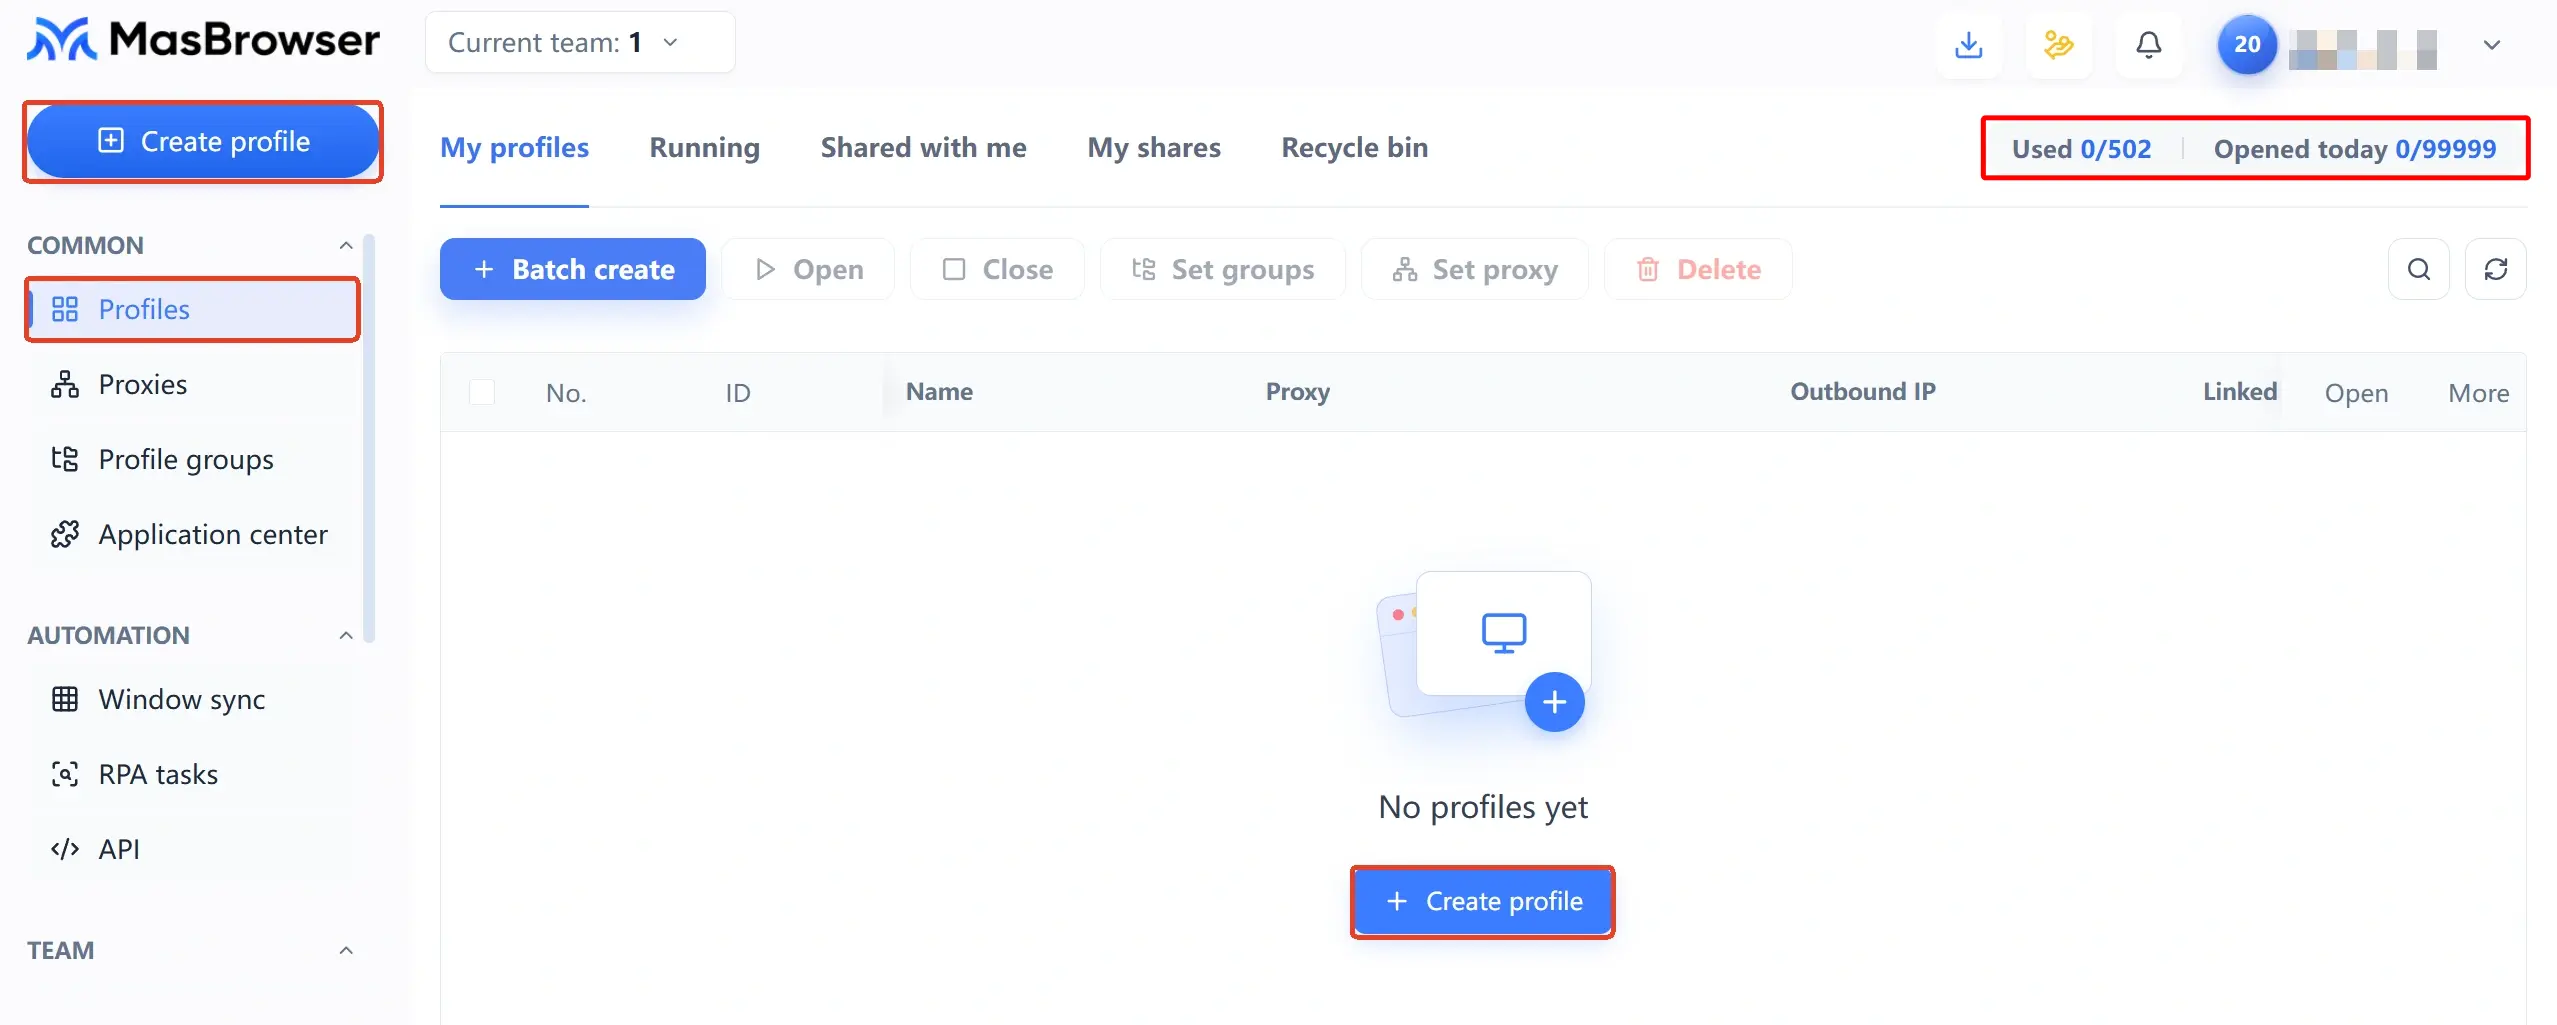
The upper-right corner of the "Profile Management" page shows your plan's profile quota usage (e.g., "0/592 used"). Once the quota is used up, you won't be able to create new profiles — upgrade your plan or delete unused profiles to continue.
Step 2: Fill in Basic Info
The profile creation panel is divided into three sections from top to bottom — "Basic Info", "Fingerprint Settings", and "Advanced Settings". Start with Basic Info.
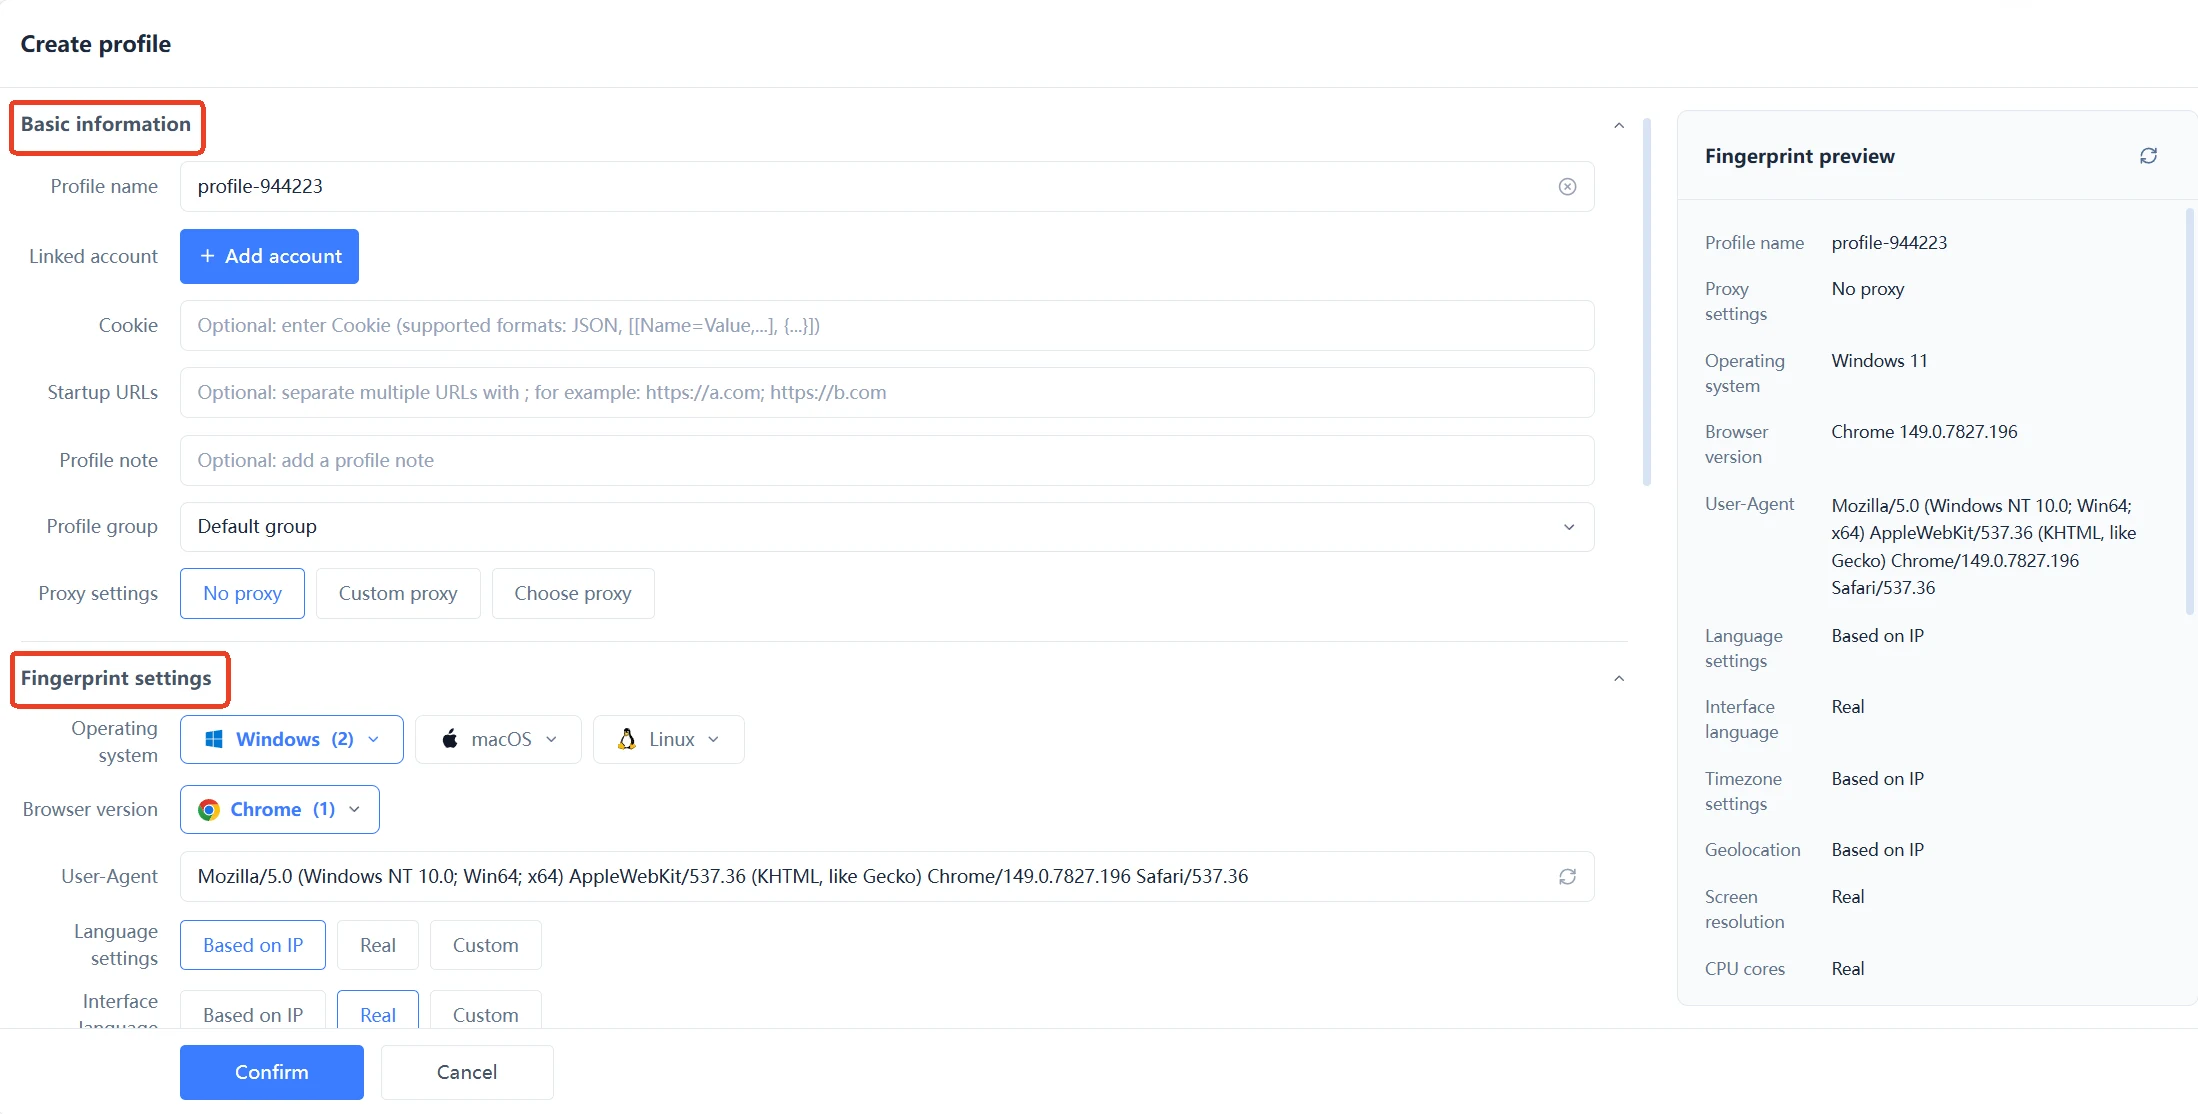
| Field | Required | Description |
|---|---|---|
| Profile name | Yes | Defaults to profile- plus a number; rename it to an account or store name that's easy to recognize |
| Bound account | No | Click "+ Add Account" to link an existing account |
| Cookie | No | Import in JSON or [Name-Value,...] format |
| Startup URL | No | URL(s) opened automatically after the profile launches; multiple URLs supported |
| Notes | No | Helps you quickly identify what the profile is for |
| Profile group | Yes | Defaults to "Default Group"; switch to any group you've created |
| Proxy settings | Yes | No proxy / Custom proxy / Saved proxy — see below |
The three proxy options:
- No proxy: uses your local network directly, ideal for local testing
- Custom proxy: manually enter the proxy address, port, username, and password
- Saved proxy: use a proxy stored in "Proxy Management"
If different accounts need different network exits, assign an independent proxy to each profile. For detailed proxy configuration, see the "Proxies & Network" category.
Step 3: Configure Fingerprint Settings
First-time users can keep the default fingerprint configuration — the system automatically generates a complete browser fingerprint.
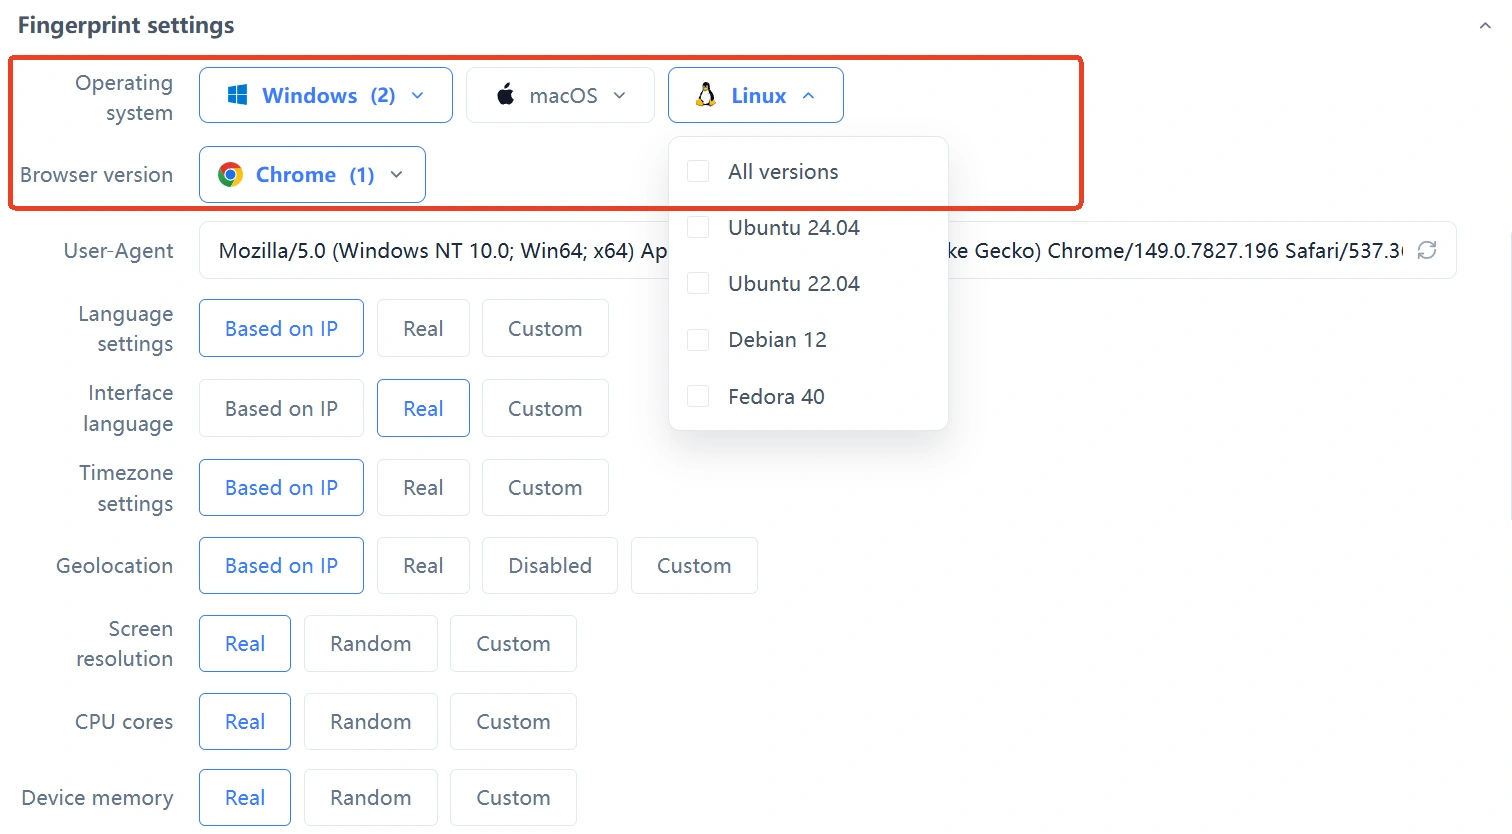
The two settings at the top define the profile's core identity:
| Setting | Description |
|---|---|
| Operating system | Choose Windows / macOS / Linux, then pick a specific system version |
| Browser version | Currently offers Chrome kernel versions |
| User Agent | Generated automatically based on the selected OS and browser version; click the icon on the right of the input box to regenerate |
The remaining fingerprint parameters each offer multiple modes:
| Parameter | Options |
|---|---|
| Language / Time zone | Based on IP / Real / Custom |
| Geolocation | Based on IP / Real / Disabled / Custom |
| Screen resolution | Real / Random / Custom |
| CPU cores / Device memory / Font list | Real / Random / Custom |
| WebRTC | Real / Disabled / Custom |
| Canvas / ClientRects / SpeechVoices / WebGL image | Real / Noise |
| WebGPU | Real / Random / Custom |
| Do Not Track | Default / Enabled / Disabled |
With the defaults, "Language", "Time zone", and "Geolocation" are automatically matched to the proxy's exit location via "Based on IP", while the other parameters use "Real" or "Noise" mode to stay consistent with one another.
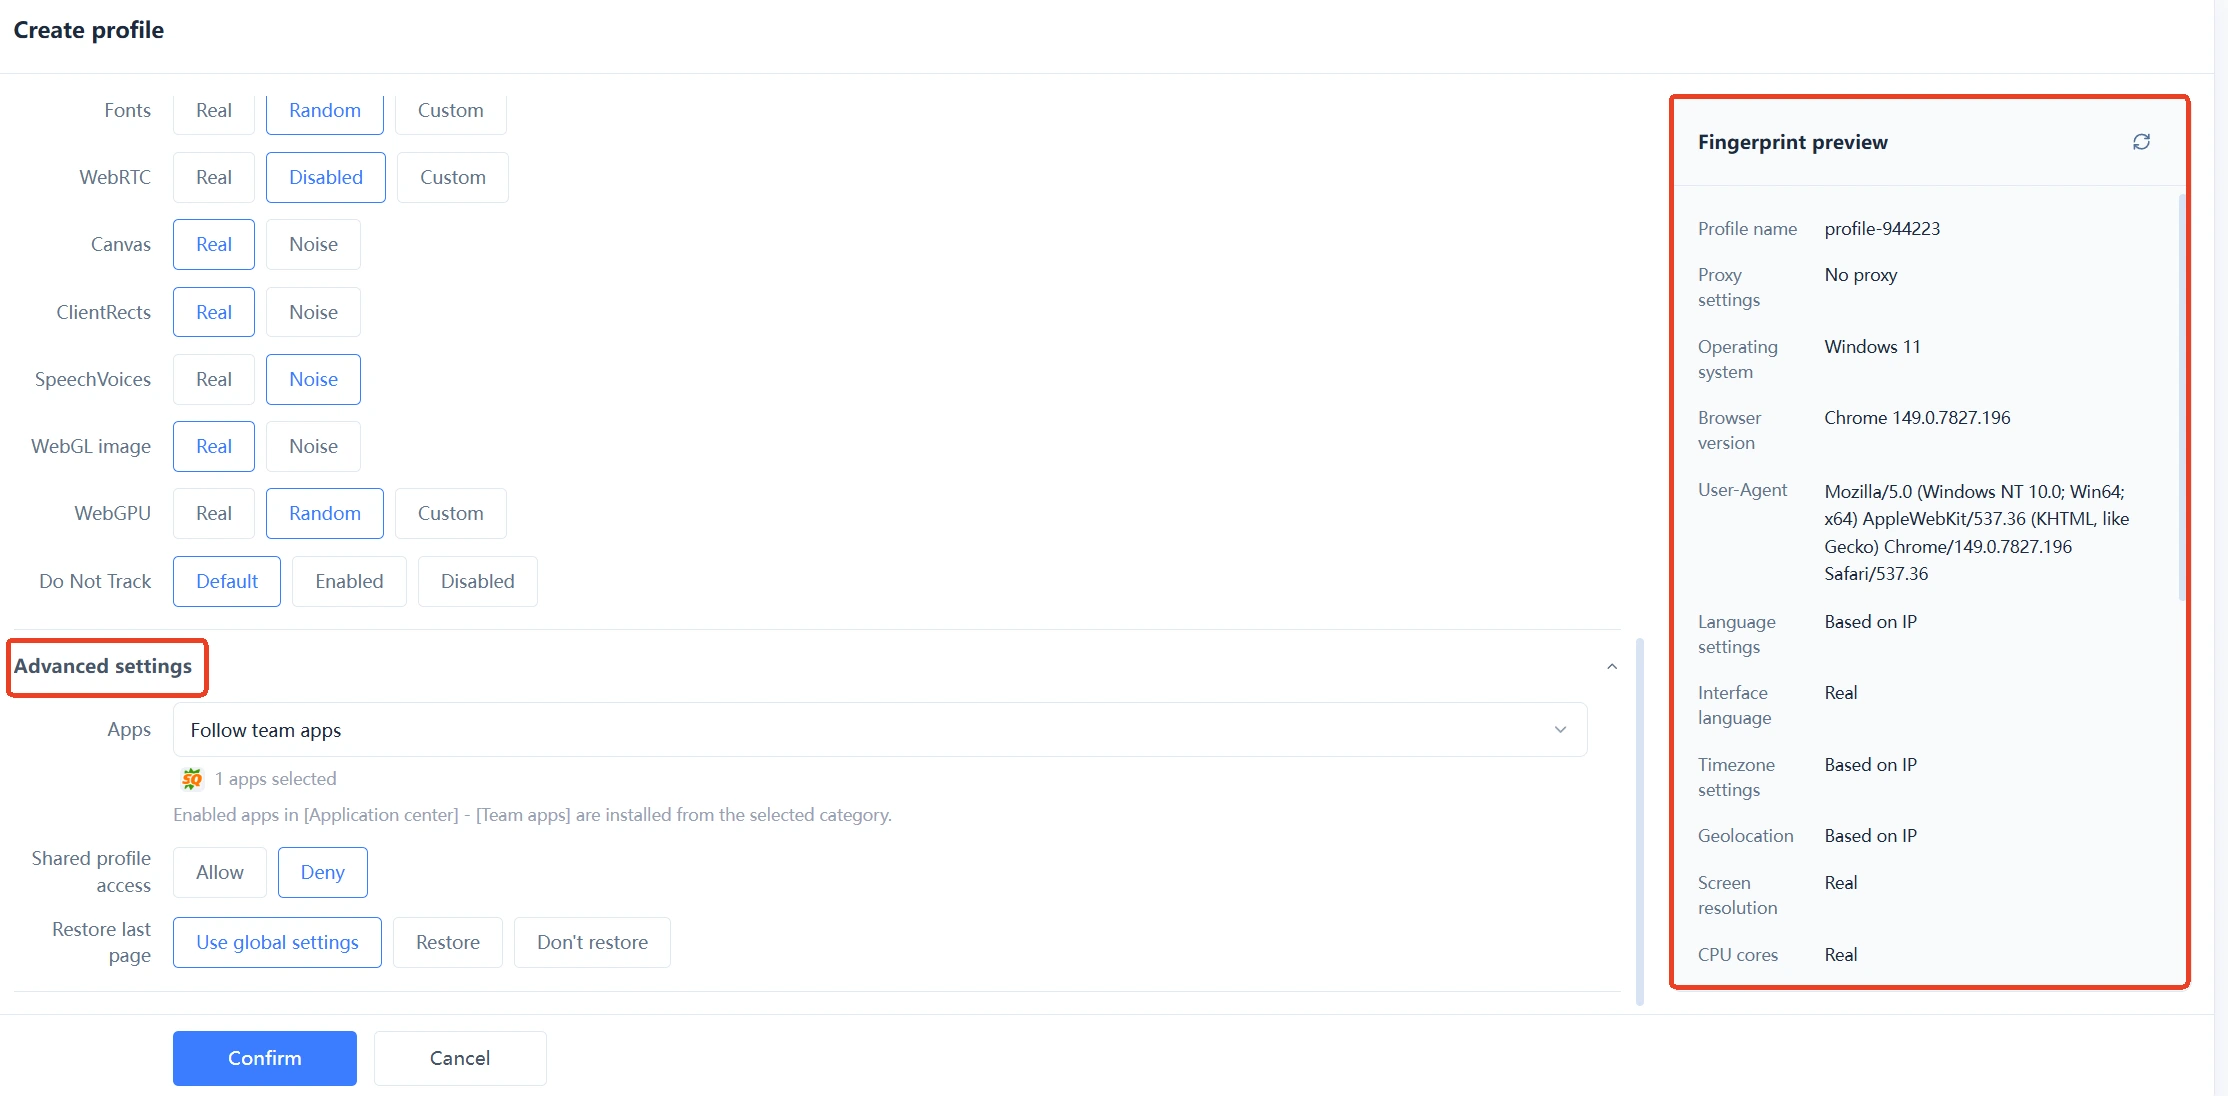
The "Fingerprint Preview" panel on the right shows the current profile's fingerprint configuration in real time (profile name, proxy type, operating system, browser kernel, User Agent, and more), and updates instantly whenever you change a parameter.
For the purpose and use cases of each fingerprint parameter, refer to "Fingerprint Parameters Explained".
Step 4: Advanced Settings (Optional)
All three options in Advanced Settings have defaults — you can save without changing anything.
| Setting | Options | Description |
|---|---|---|
| Apps | Select team apps / None | Choose the team apps to enable for this profile; available apps must first be added under "App Center → Team Apps" |
| Profile sharing access | Allow / Block | Whether other team members can access this profile |
| Restore last session | All settings / Restore / Do not restore | Whether previously opened tabs are restored the next time the profile launches |
Step 5: Save and Verify
Once everything is set, click the "Confirm" button at the bottom to save.
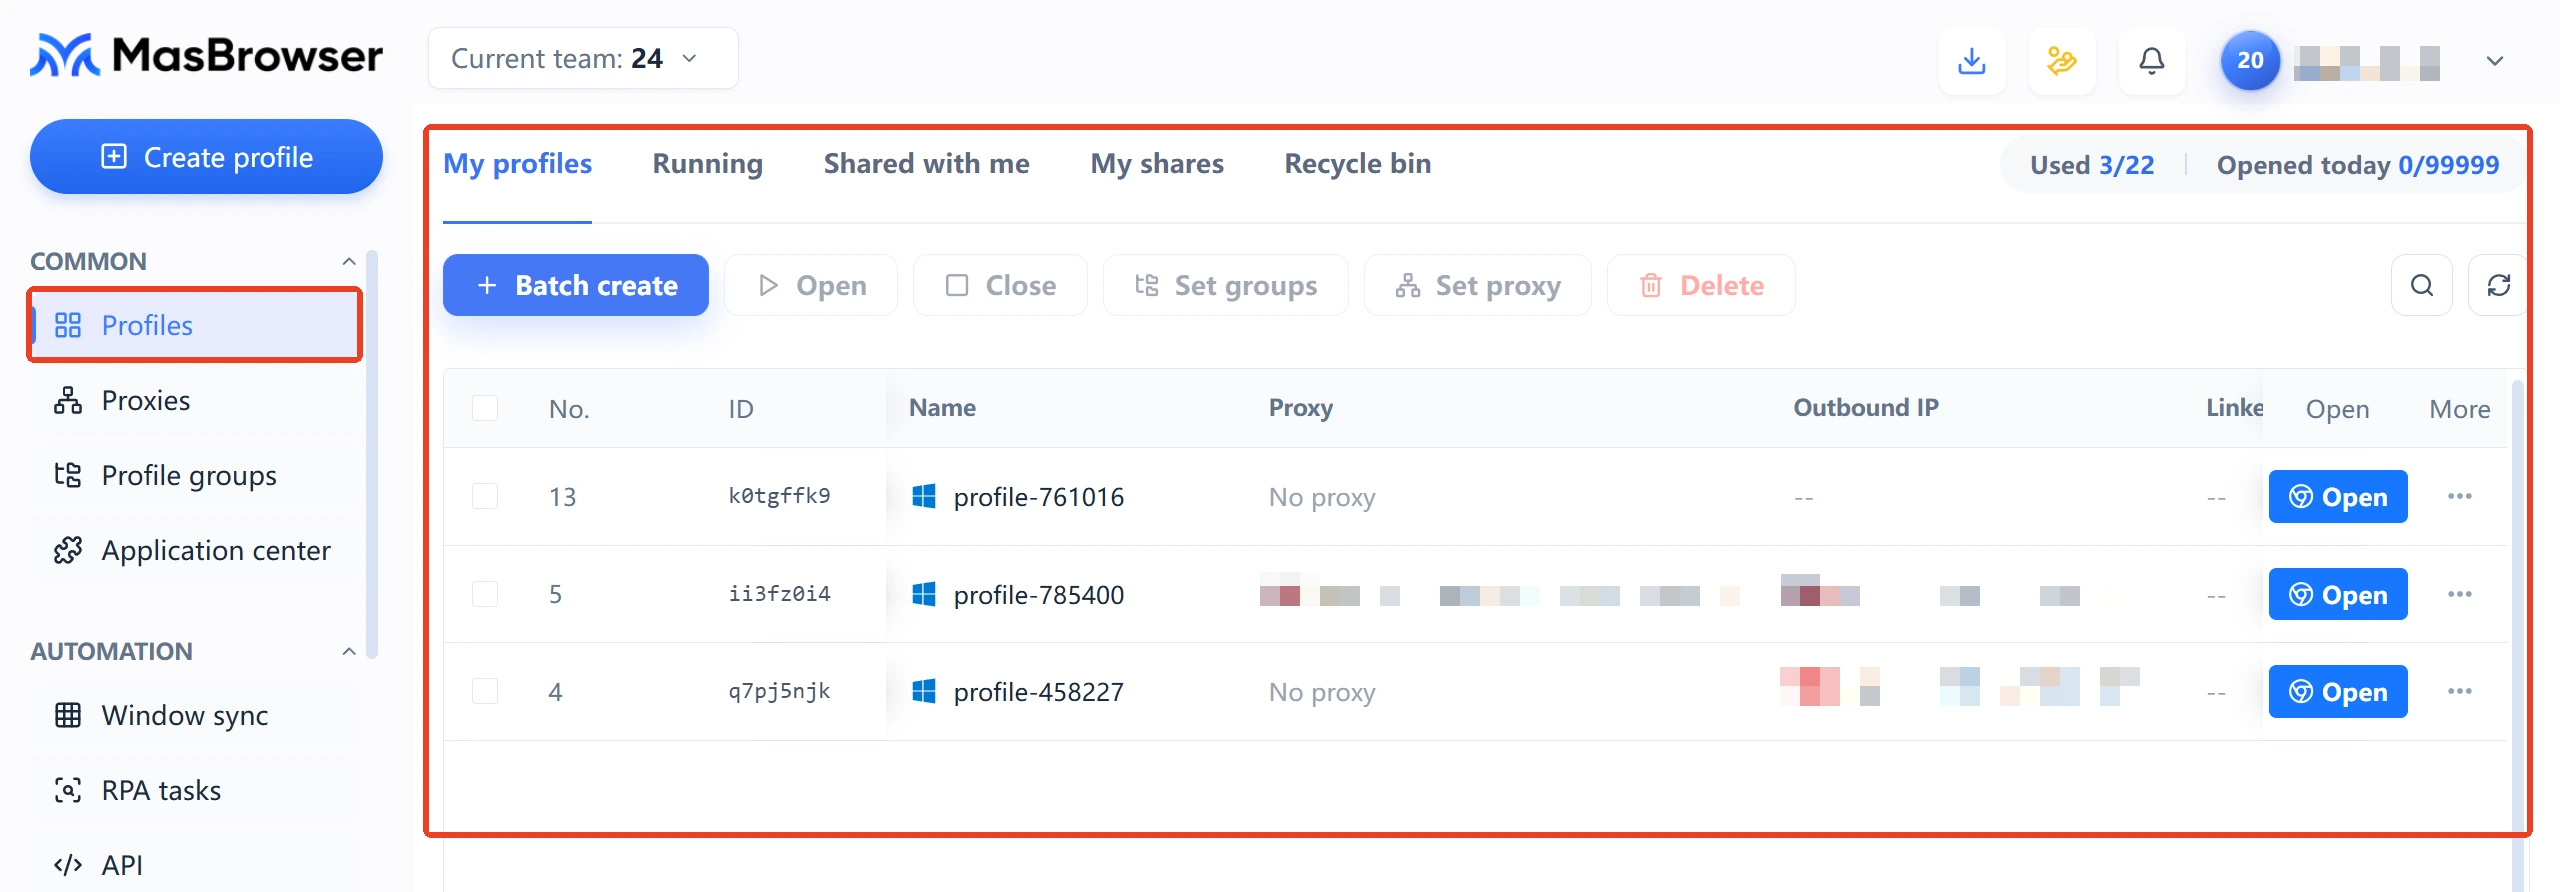
After saving, the new profile appears in the "My Profiles" list. Click the "Open" button at the end of its row to launch a browser window — if pages load normally, the profile was created successfully.
Batch-Create Profiles
To create multiple profiles at once, use the "Batch Create" button on the "Profile Management" toolbar.
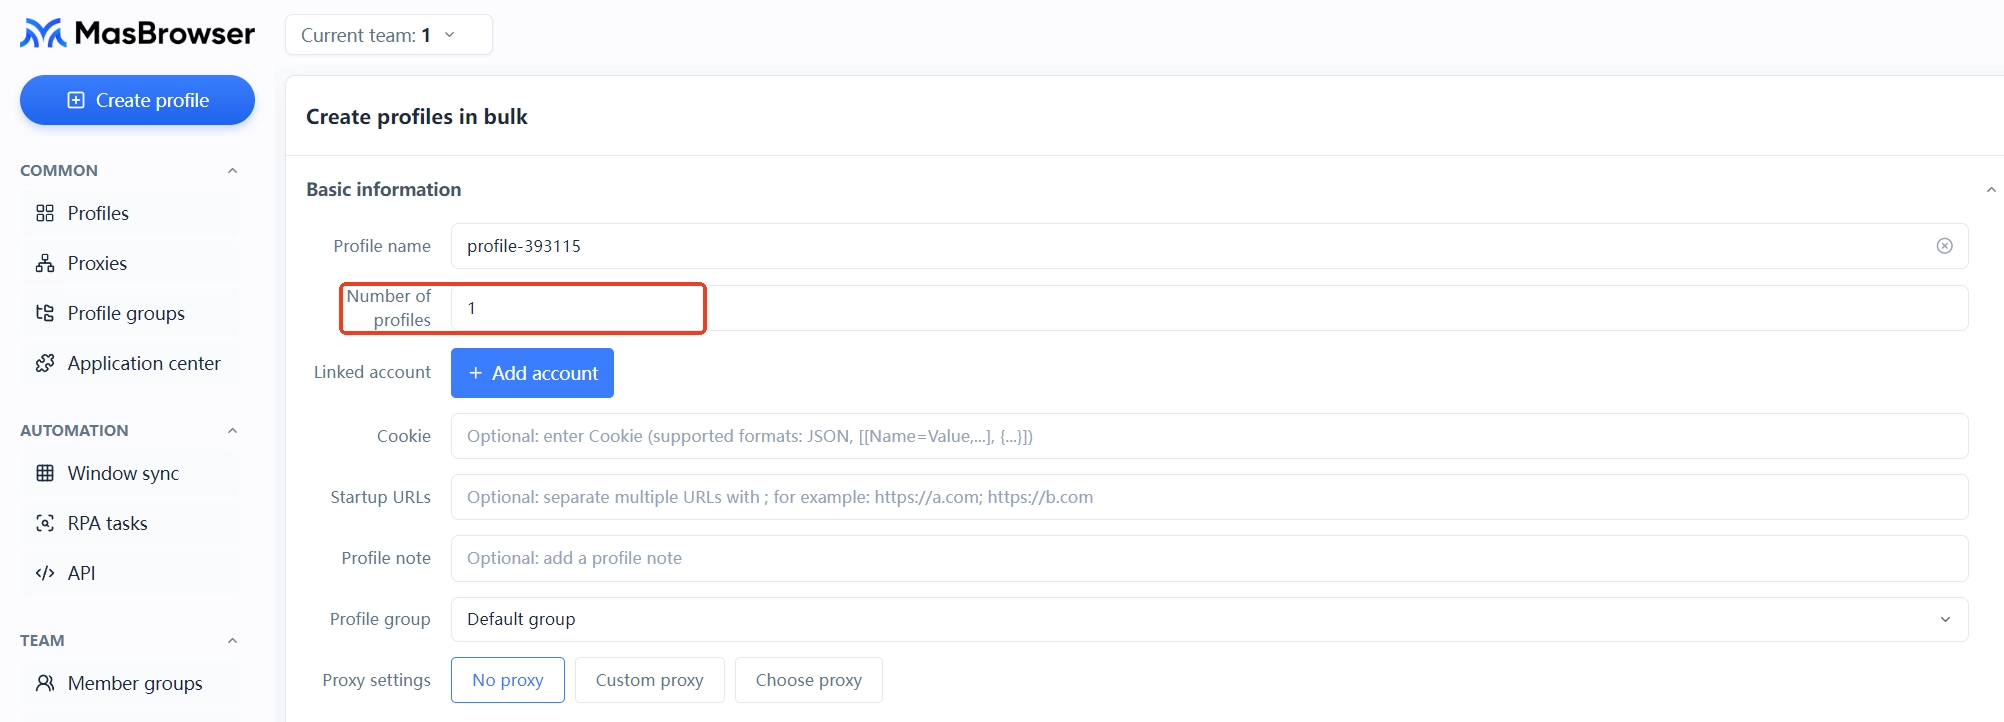
- Entry point: "Profile Management" page toolbar → "Batch Create"
- The dialog is titled "Batch Create Profiles" and contains exactly the same settings as single creation (Basic Info, Fingerprint Settings, Advanced Settings), plus a "Number of profiles" field below the profile name, defaulting to 1
- Enter the number of profiles and click "Confirm" — the system generates them in bulk, all using the basic info and fingerprint configuration set in the dialog
- Batch-created profiles appear in the "My Profiles" list like any other, and each can be edited individually (name, proxy, and more)
FAQ
Can I rename a profile after creating it?
Yes. Simply edit the "Profile name" field when creating it. The default profile- plus a number is just a system ID — renaming it to something recognizable is recommended.
Do I need to configure every fingerprint parameter?
No. The defaults work fine out of the box: language, time zone, and geolocation are matched automatically to the proxy exit, while the remaining parameters are generated by the system and kept consistent. Adjust them individually only when you have specific needs.
Which option should I choose for "Proxy settings"?
Choose "No proxy" for local testing. For multi-account operations, assign each profile its own custom or saved proxy so different profiles use different network exits.
How many profiles can I create on the free plan?
The profile quota depends on your plan. The "Profile Management" page shows your used count and total quota in the upper-right corner in real time — upgrade under "Plans & Pricing" when you run out.
Where can I find a profile after creating it?
Go back to the "My Profiles" tab — new profiles appear in the list. Select a profile and click the "Open" button at the end of its row to launch it.