
MasBrowser Quick Start Guide
Learn MasBrowser basics: download, create profiles, configure proxies, and launch browsers. Master multi-account anti-detect browsing in minutes.
This guide walks new MasBrowser users through the shortest path to a first successful session: log in → create your first browser profile → launch the browser → complete your first login.
Step 1: Log in to MasBrowser
Open the MasBrowser client, log in with your registered account, and you will land on the "Profile Management" page by default.
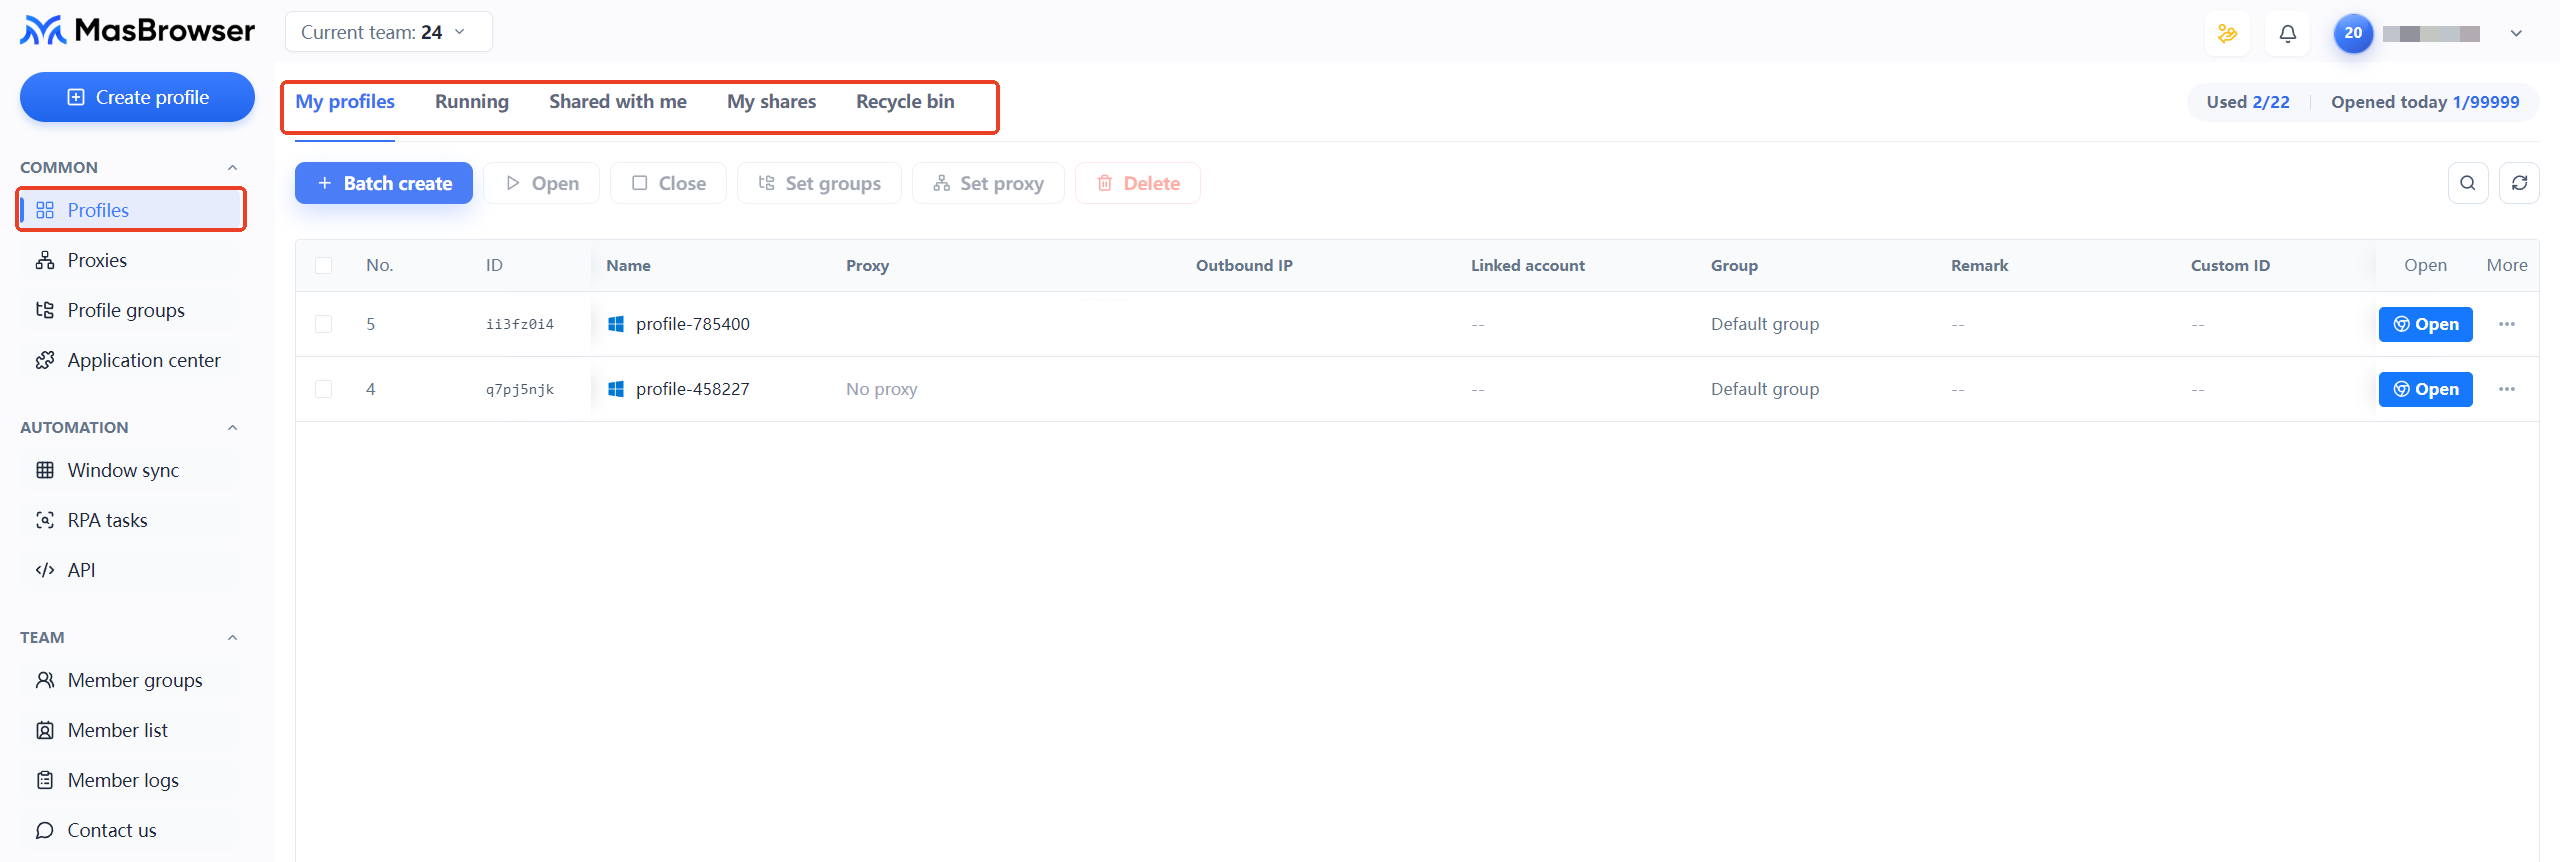
The main interface consists of three areas:
- Top tabs: page-switching tabs above the profile list, used to toggle between different views — "My Profiles", "Running", "Shared with Me", "Shared by Me", and "Recycle Bin"
- Left navigation: entry points to all client features, organized into 4 groups:
- Common: Profile Management, Proxy Management, Profile Groups, App Center
- Automation: Window Sync, RPA Tasks, API
- Team: Member Groups, Member List, Member Logs, Contact Us
- Billing: Billing Details, Plans & Pricing, Referral Rewards
- Middle list: the profile data under the current tab. Each row shows the profile ID, name, proxy, group, notes, and more
Step 2: Create your first browser profile
Entry point: click the "+ Create Profile" button in the upper-left corner to open the profile creation panel.
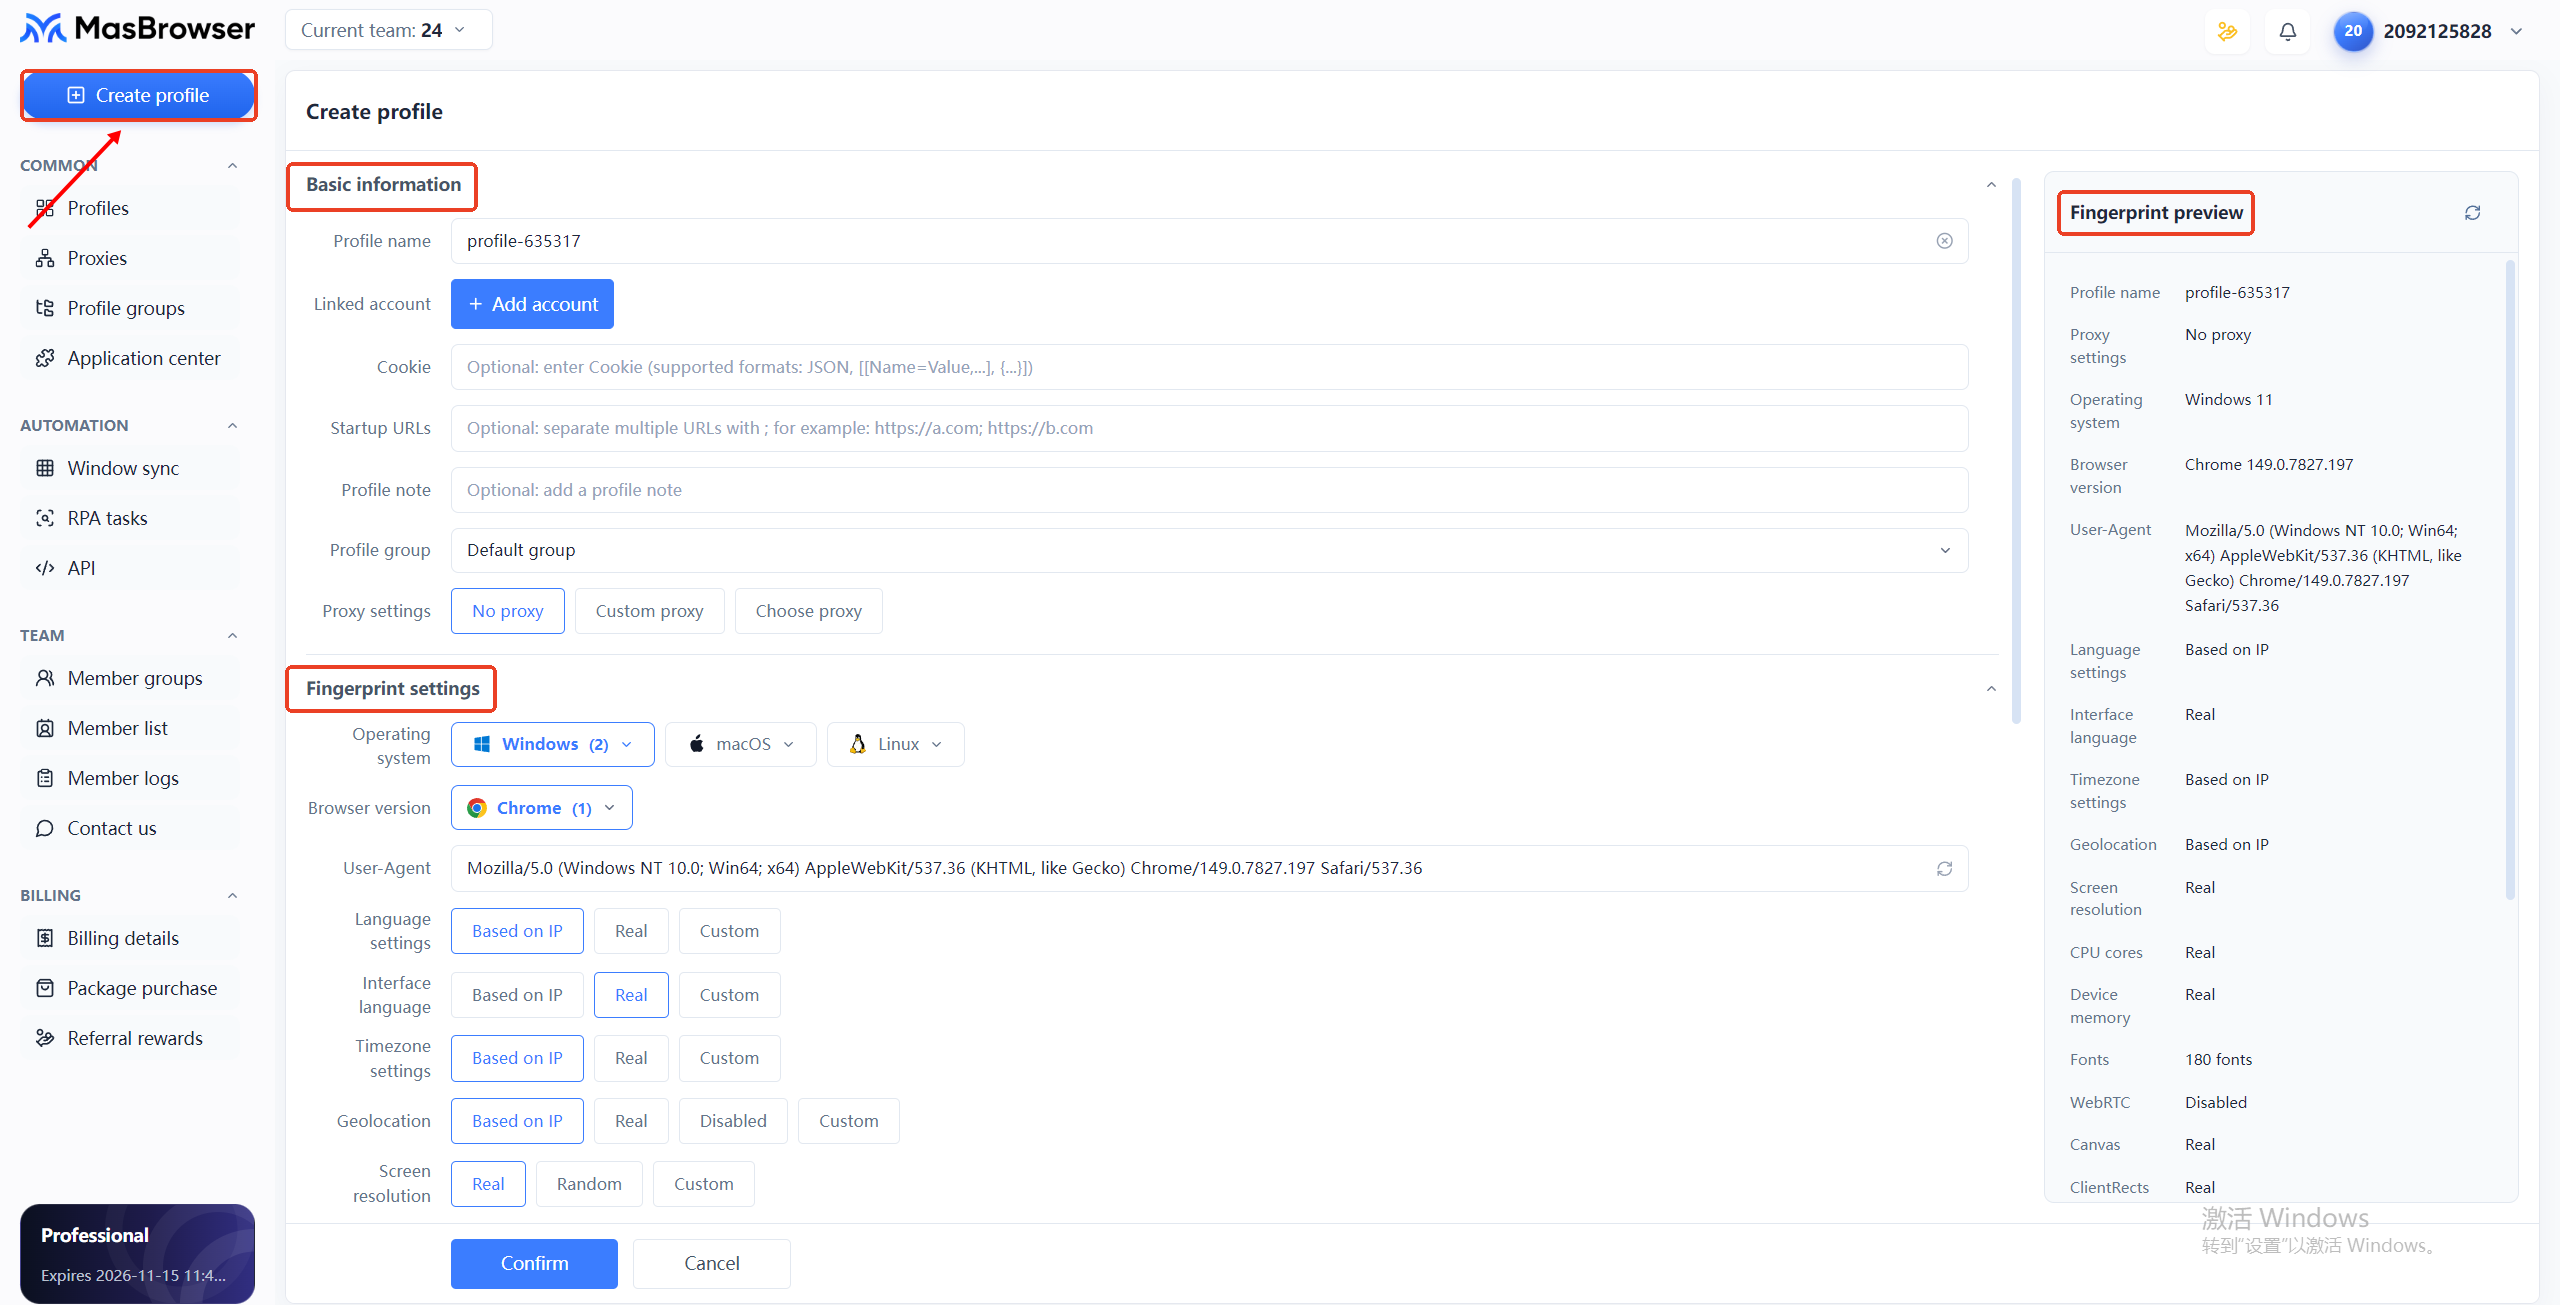
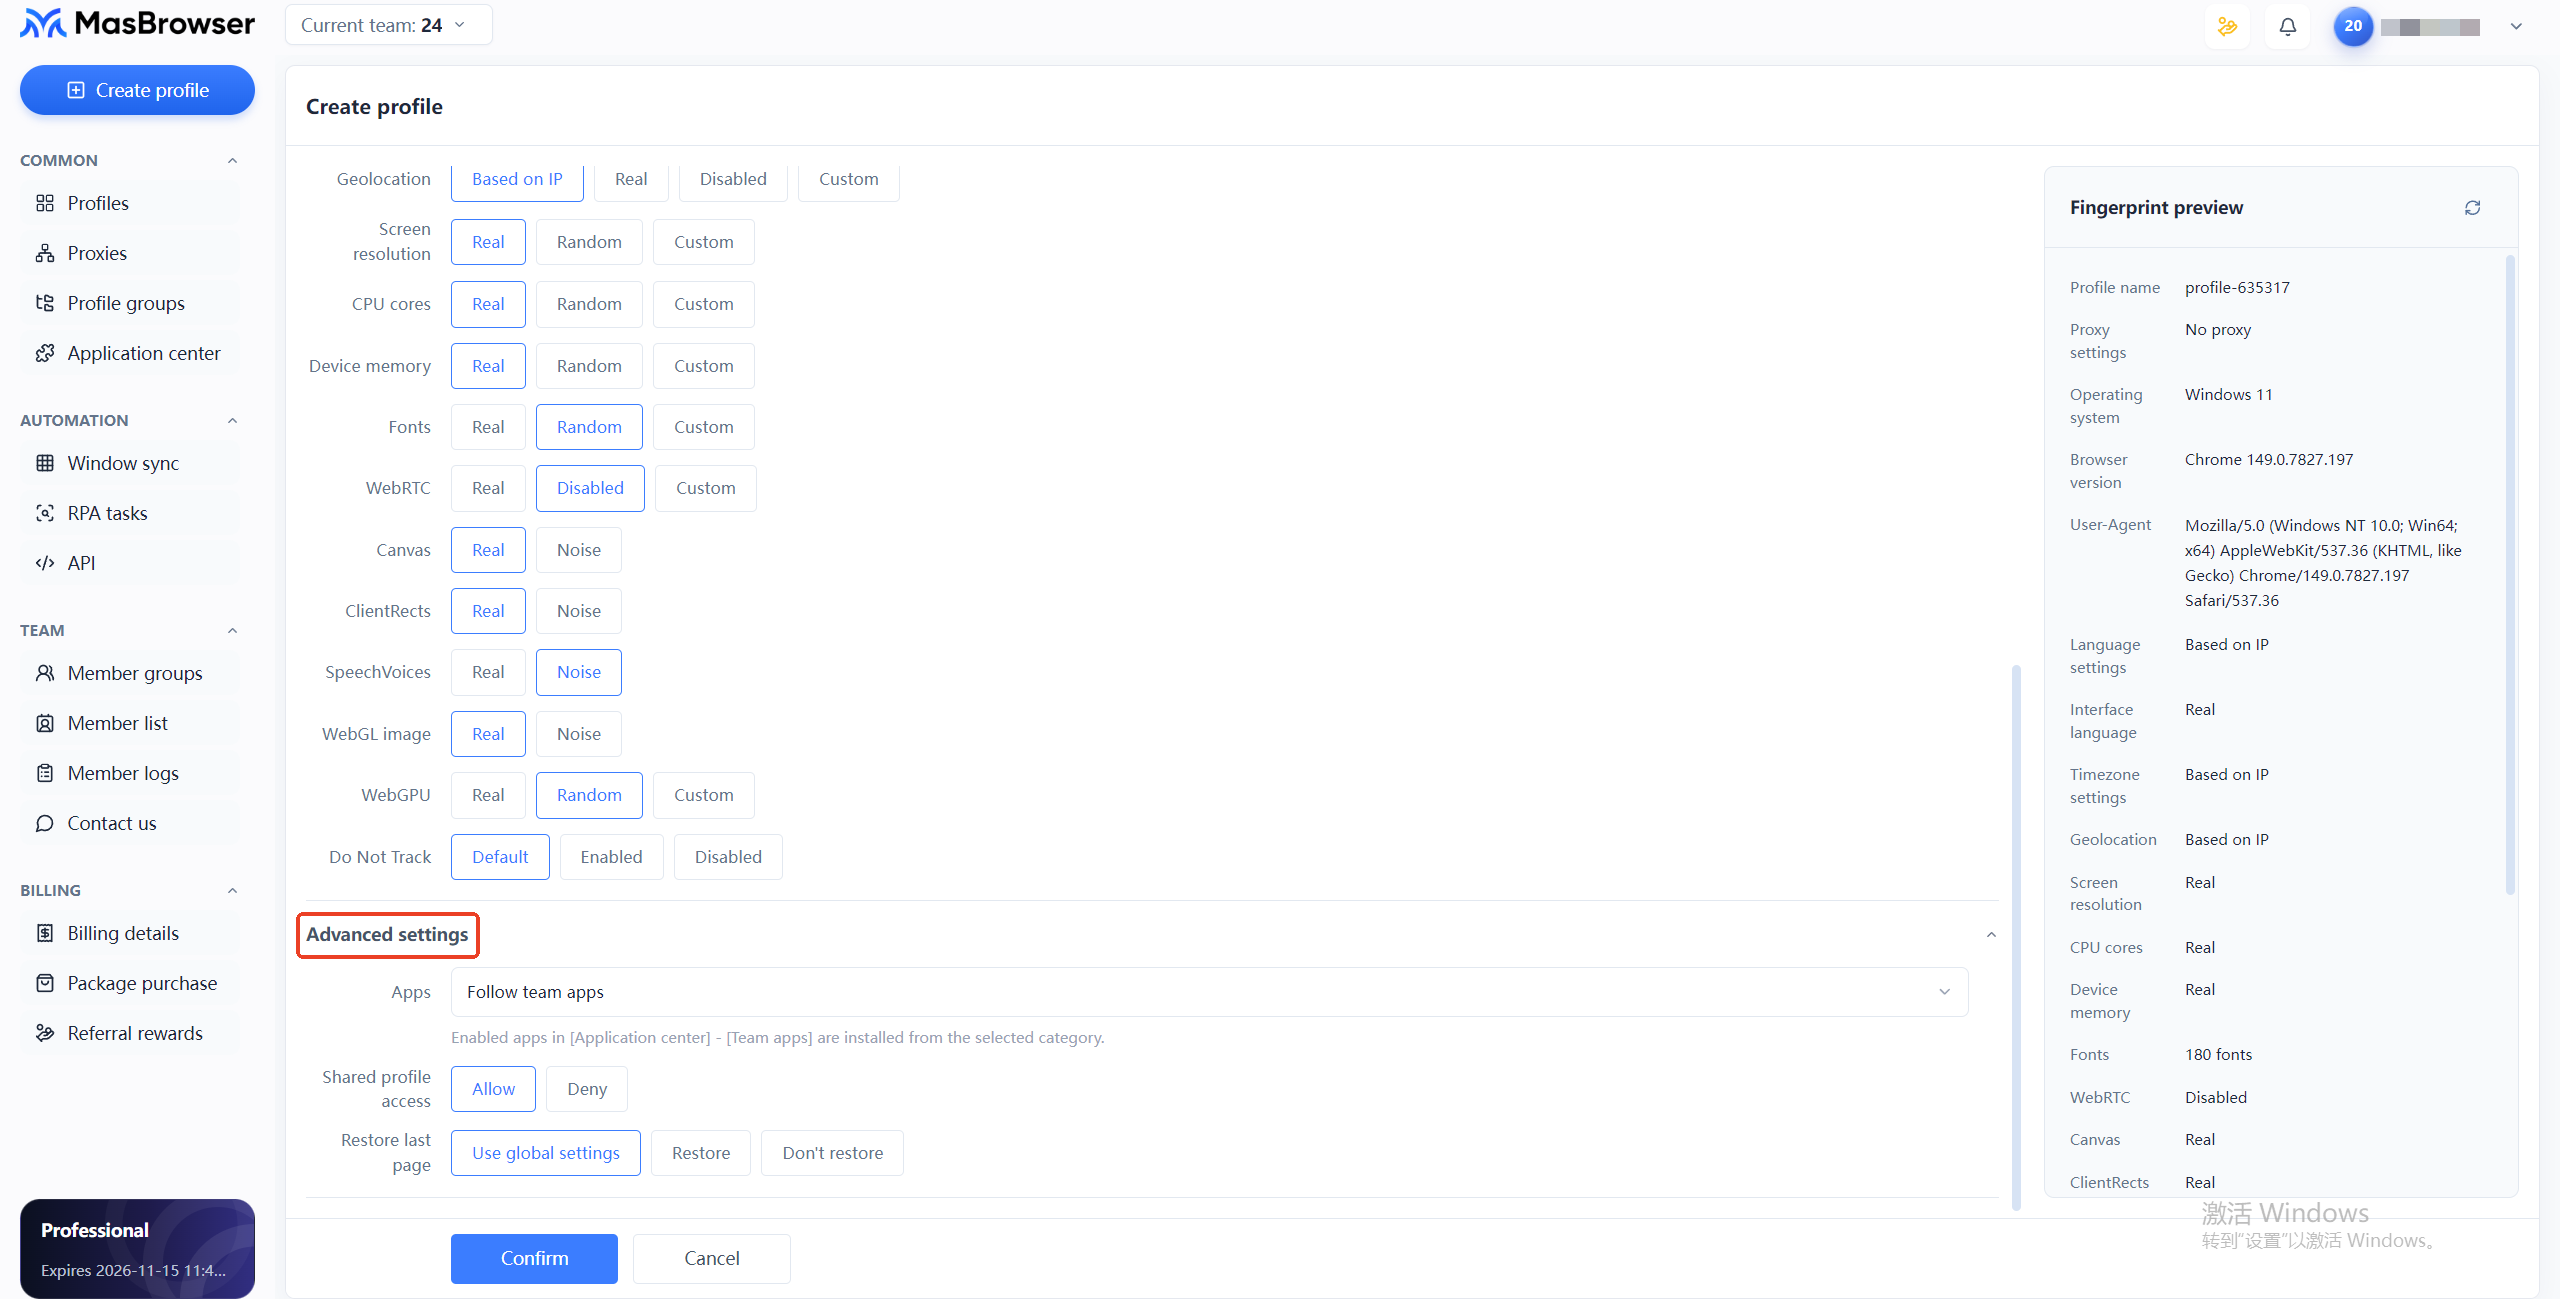
The profile creation panel is divided into three sections from top to bottom: Basic Info, Fingerprint Settings, and Advanced Settings, with a "Fingerprint Preview" panel on the right that shows the fingerprint configuration of the current profile in real time.
Basic Info
Basic Info covers the profile's fundamental settings and proxy configuration.
| Field | Required | Description |
|---|---|---|
| Profile name | Yes | Defaults to profile- plus a number; rename it to something easy to recognize, such as the account name |
| Bound account | No | Click "+ Add Account" to link an existing account |
| Cookie | No | Accepts JSON or [Name-Value,...] format |
| Startup URL | No | URL(s) opened automatically after launch; separate multiple URLs with ; |
| Notes | No | Helps you quickly identify the profile in the list |
| Profile group | Yes | Defaults to "Default Group" |
| Proxy settings | Yes | No proxy / Custom proxy / Saved proxy — see below |
The three proxy options:
- No proxy: uses your local network
- Custom proxy: manually enter the proxy address, port, username, and password
- Saved proxy: use a proxy stored in "Proxy Management"
If different accounts require different network exits, you can assign an independent proxy to each profile. For detailed proxy configuration, see the "Proxies & Network" category.
Fingerprint Settings
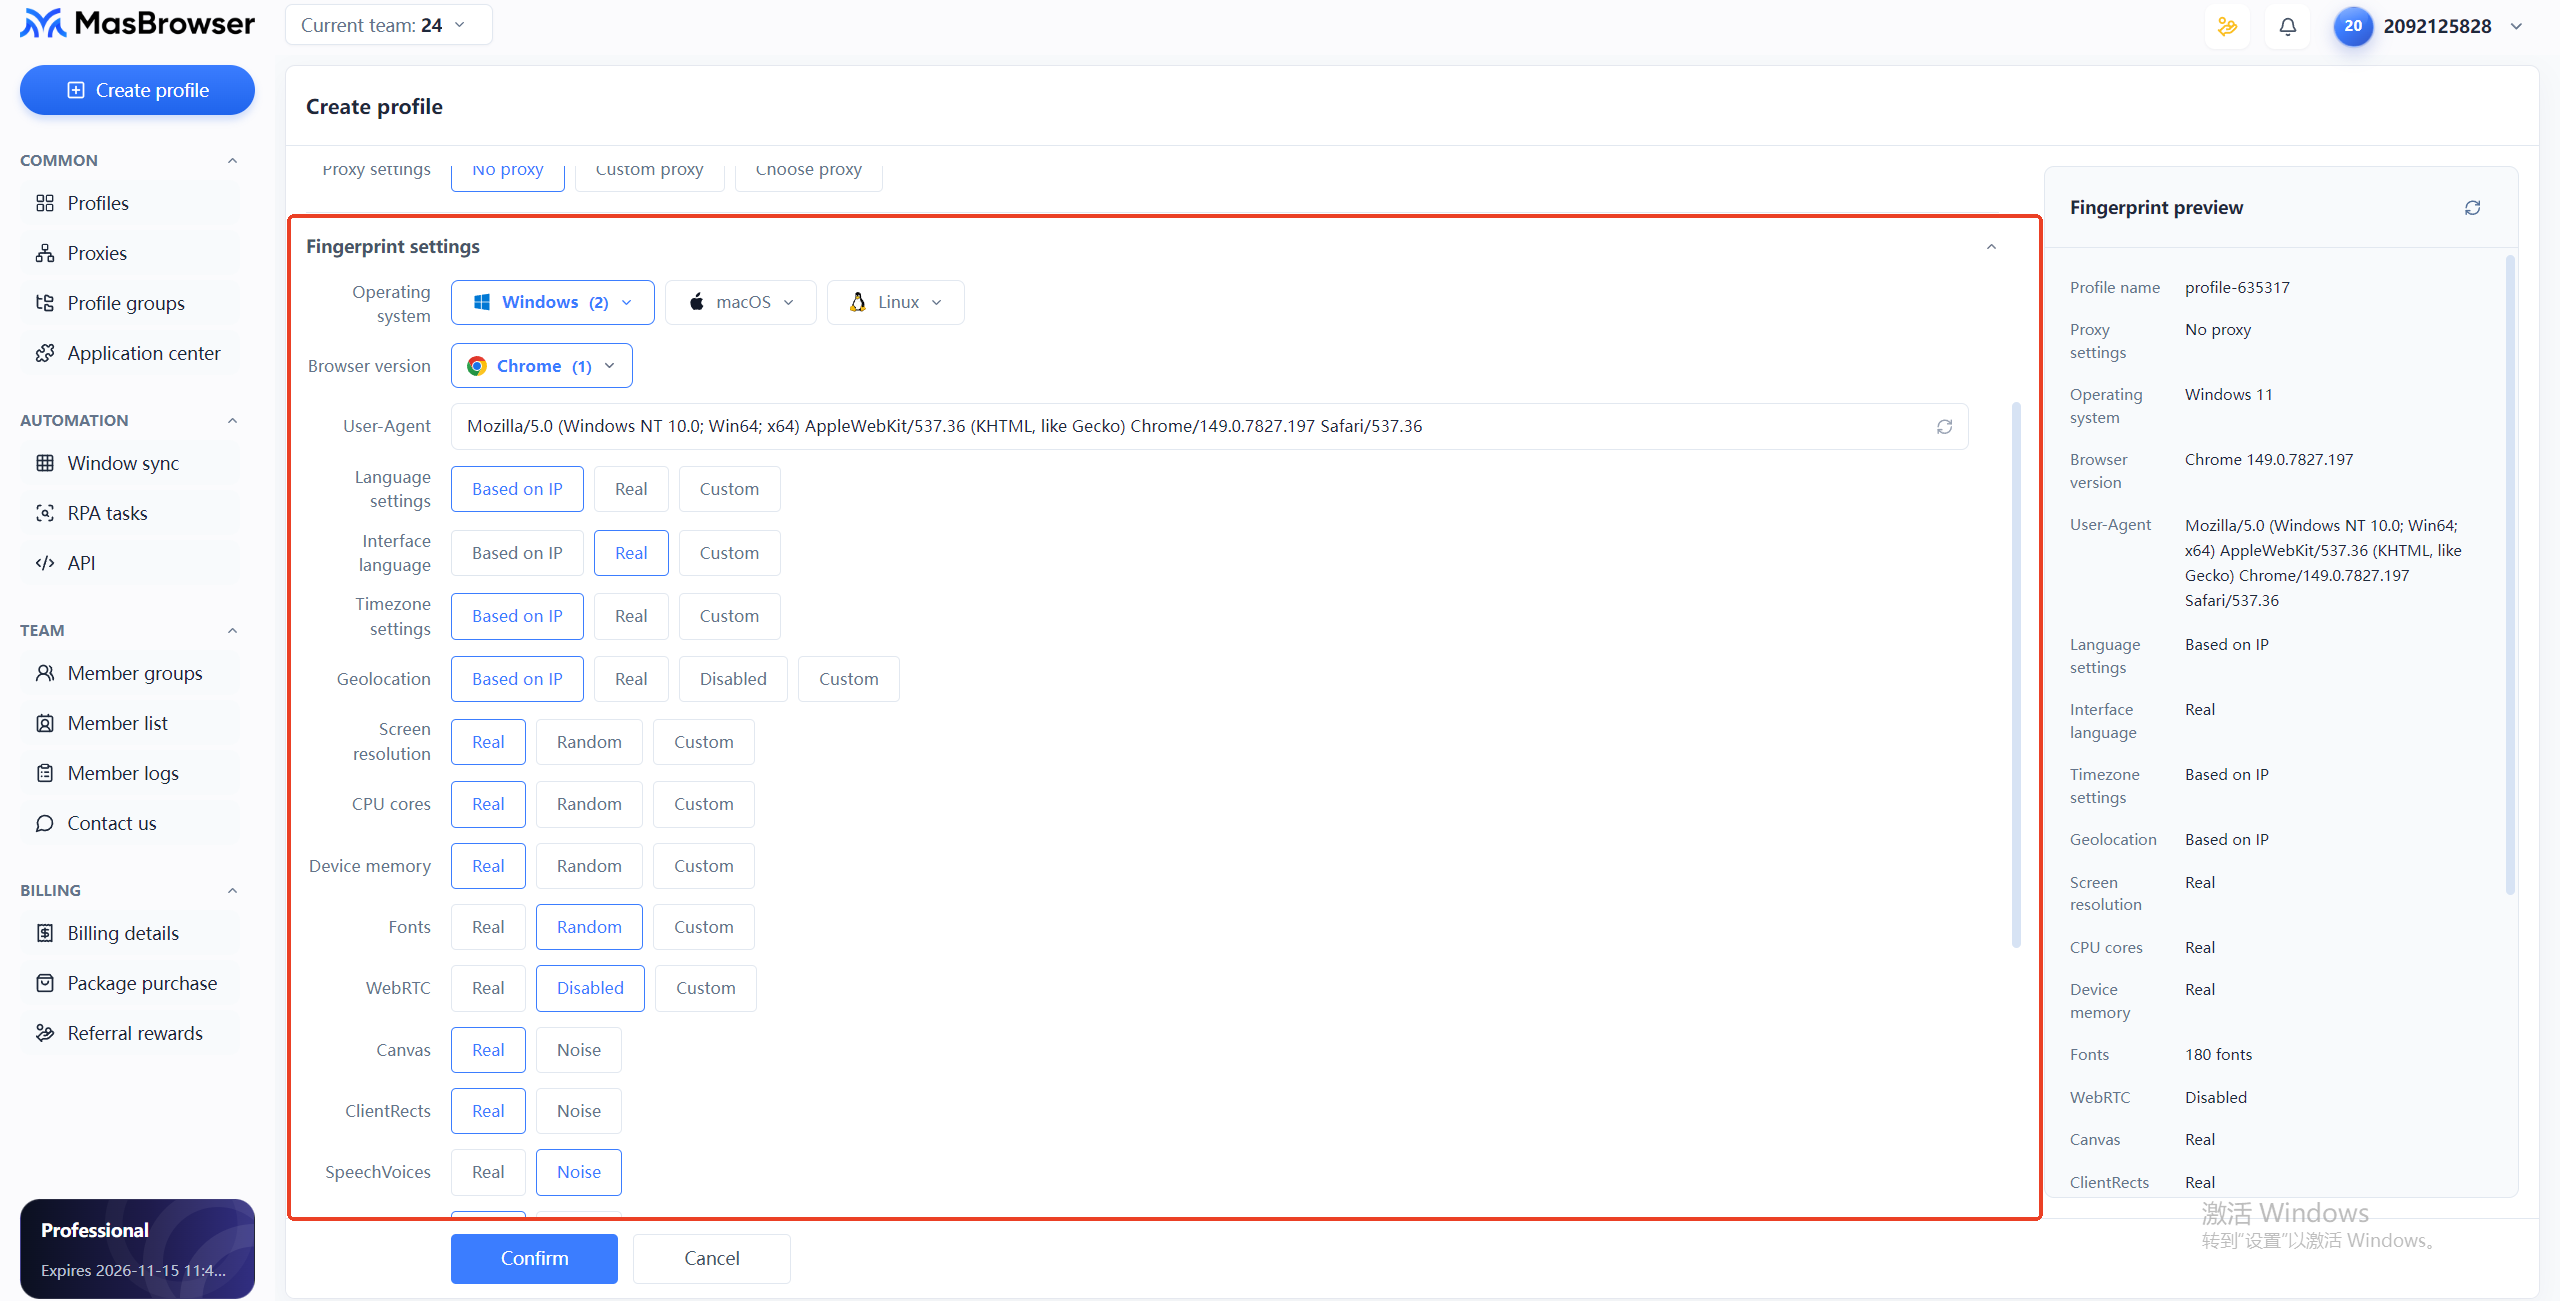
First-time users can keep the default fingerprint configuration — no need to adjust each parameter.
If your use case requires adjusting parameters such as operating system, browser version, User Agent, language, time zone, or WebRTC, you can configure them under Fingerprint Settings.
For the purpose and configuration of each fingerprint parameter, refer to "Fingerprint Parameters Explained".
The "Fingerprint Preview" panel on the right shows the current profile's fingerprint configuration in real time (operating system, browser version, User Agent, language, time zone, and more), and updates instantly whenever you change a parameter.
Advanced Settings
| Setting | Options | Description |
|---|---|---|
| Apps | Select team apps / None | Choose the team apps to enable for this profile; you can click "+ New Category" in the dropdown to create an app category. Categories are managed under "App Center → Team Apps → App Categories" |
| Profile sharing access | Allow / Block | Whether other team members can access this profile |
| Restore last session | All settings / Restore / Do not restore | Whether tabs are restored the next time the profile is launched |
Save
Once everything is set, click the "Confirm" button at the bottom to save.
Step 3: Launch the browser profile
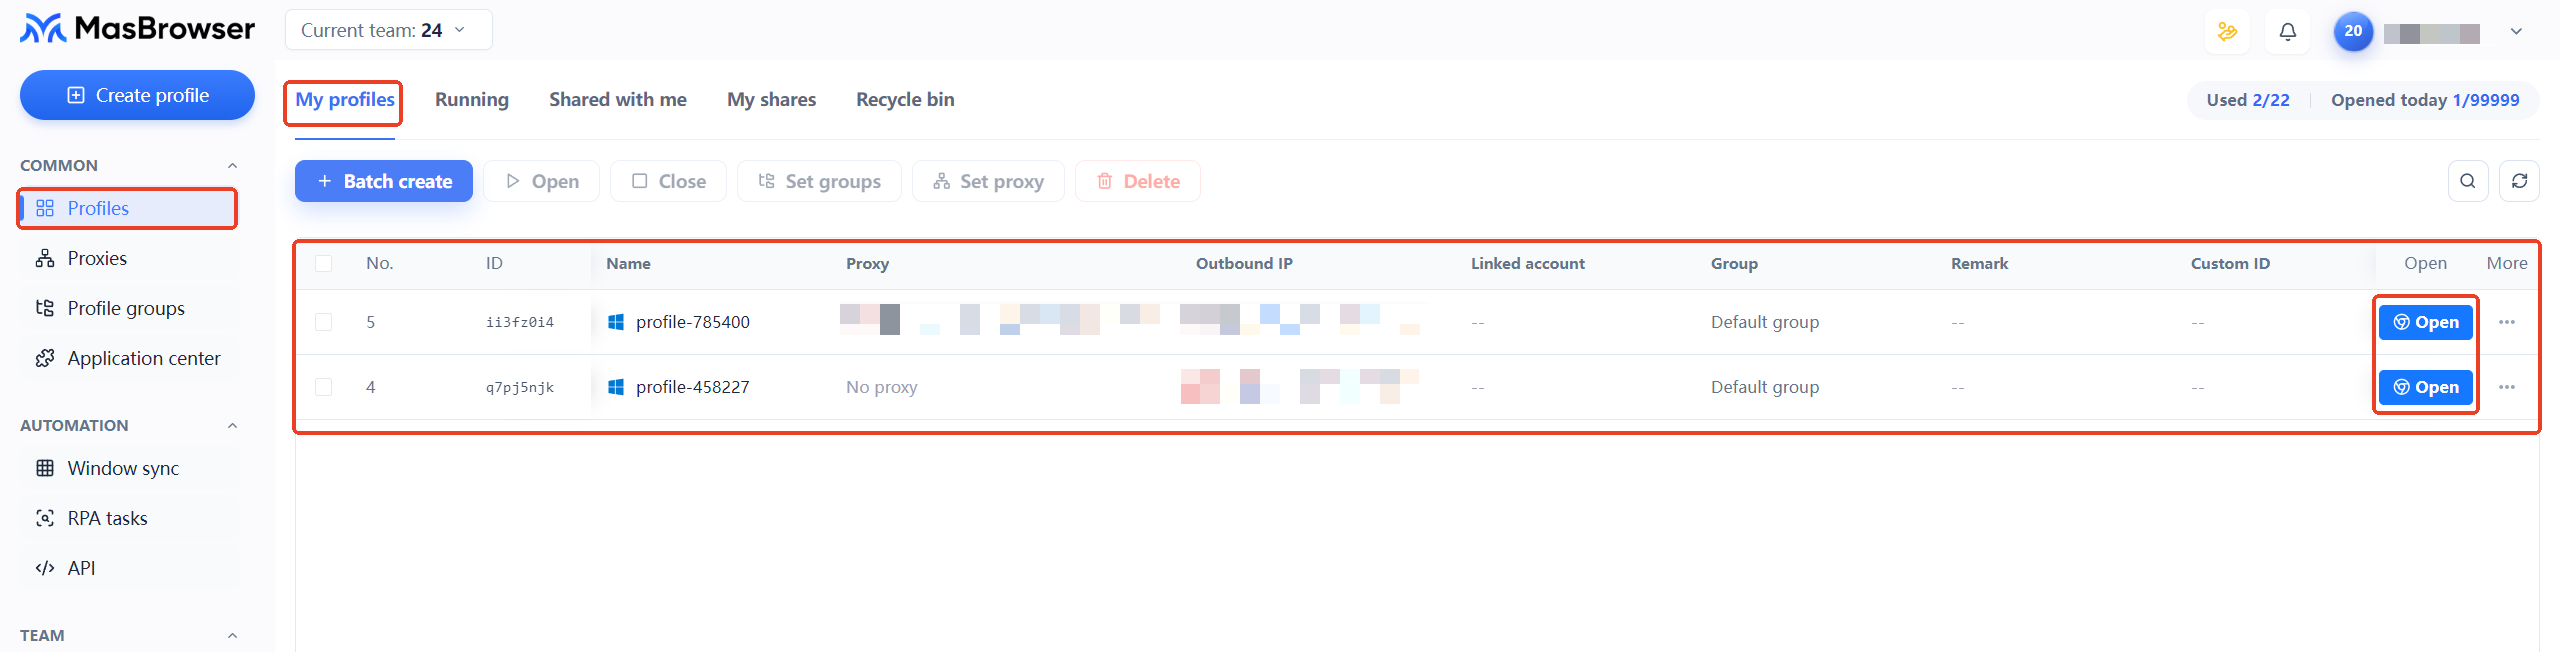
After saving, the new profile appears in the "My Profiles" list. Click the "Open" button at the end of its row to launch a browser window.
Step 4: Complete your first login
Once the browser window opens, simply log in to the target platform account as usual.
The profile's cookies, local storage, and proxy network are fully isolated from all other browser profiles.
FAQ
Which option should I choose for "Proxy settings" when creating a profile?
For local testing, choose "No proxy". If different accounts need different network exits, select "Custom proxy" or "Saved proxy" and fill in the corresponding details.
Do I need to adjust every fingerprint parameter?
No. First-time users should keep the default configuration. For what each parameter does, see "Fingerprint Parameters Explained".
Where can I find a profile after creating it?
Go back to the "My Profiles" tab — the newly created profile appears at the top of the list.
How many profiles can I create on the free plan?
The quota depends on your plan. Check your current quota and upgrade options under "Plans & Pricing" in the client.